Having done a first version and then a ~2010ver.~ a year later, after upgrading a few things, it made sense to follow-up with a… (wait for it)… ~2011ver.~ post. So how ’bout them podcasts, huh?
When we last checked in on the setup, I was considering cleaning out one of the extra rooms in our finished basement to make a quasi-“recording studio”. The room was a moderate disaster of half-empty boxes and miscellaneous extra crap from when we first moved in, but it would likely make for a fantastic recording area — low ceiling, closing door, a desk was already there, and the wireless signal reached all the way down there from two floors up.

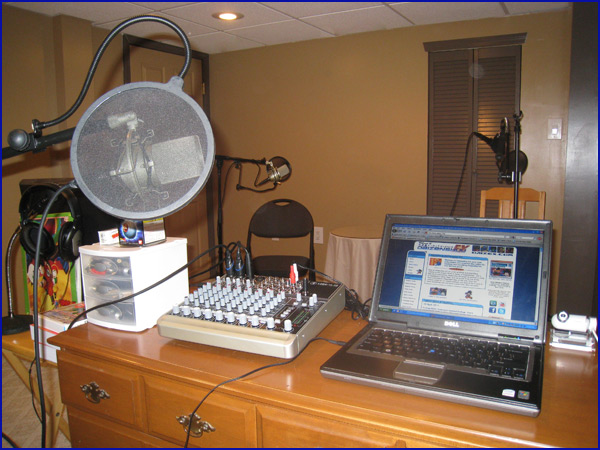
Well, the room got cleaned out, and we have been recording down there for a few months now. I couldn’t ask for much better out of such minimal work! Here is an updated, general view of the area:

With the overview done, let’s dig into the hardware! I again have to preface this by saying that I don’t actually know anything about audio or any type of engineering, so this is all self-taught, trial-and-error based on moderate research and reading. I’m probably doing stuff wrong, I’m probably doing it all inefficiently… but it seems to be working out so far. Take my advice and recommendations with a modest-sized grain of salt.
One of the most important upgrades has been from the Behringer Eurorack UB802 (~$50-60) mixer to the Mackie 1202-VLZ3 (~$300) mixer. In addition to the two additional XLR inputs (which means no longer daisy-chaining something like Jeff’s mixer when he comes for a “Manga Review of Awesomeness”), I have much greater control over just about everything. It’s just an all-around better mixer. As I read in the reviews, I noticed a better sound with the same microphones I was already using, and there was a noticeable amount of less noise in the output signal — when tweaked properly, it is essentially whisper-quiet.

The output is still going from the “Tape Out” via the Behringer U-Control UCA-200 which came with my work mixer — no, I’m cheap and still haven’t purchased my own stand-alone UCA-202 (~$30) or similar device. This is one area that I may eventually upgrade. I’m not sure how or what I will do, since a dedicated Firewire setup is above and beyond what I need, but it feels like there might be a better way to get the audio to the computer with even better clarity and possibly normalization. Currently, the U-Control takes over as the input device, so switching Windows’ properties for what handles “in” and what handles “out” lets me use that for input, while still using the laptop’s on-board sound for output to headphones (to listen to test recordings and/or anyone on Skype).

Over on the microphone side, everything is basically the same as it has been for well over a hundred episodes. I am personally still rocking the MXL 990 condenser microphone (~$50-70), which is held up by a Samsom BT4 boom stand (~$40).

Within the last couple episodes, I have been keeping a duplicate of that same setup around for the wife so as to avoid using the Shure microphone (see below). It’s not that it’s a terrible microphone, but if I have something that’s so much better, why not use it? Having identical microphones in use (instead of both a dynamic and a condenser) also seems to help the levels and who gets picked up how much on which microphone across the room.

For when the extra microphone is absolutely necessary, I have at least tossed the Shure 8900 dynamic microphone (~$50) on an On-Stage MSA-9508 side boom (~$10-15) and gooseneck extension so it is far more adjustable in terms of position and comfort, instead of directly on top of the old RadioShack Heavy Duty Microphone Stand with Cast-Iron Base (~$30). The RadioShack stand with a larger mic clip and the boom extension also doubles as the Rock Band accessory of choice for guitar + vocals, so it all works out in the end.

In terms of headphones, I use the simple but serviceable Sennheiser HD201 (~$20-30) headphones. They are closed-ear with a super long cord, and they sound crystal-clear enough for the recording quality that I work with every week, so I haven’t felt the need to go nuts in this area.

You will probably notice some other stuff in the room that handles I guess what can only be called “logistics”. Perhaps you wonder how it is that we all read notes on the “Manga Review of Awesomeness” (OK, Jeff just uses his iPad, now…) or e-mails. Do we print out notes? Of course not! A second monitor mirrors the display from the laptop for others in the room to keep up with the general show outline. I am really tempted to put a flat-screen TV up against that wall on the left in the future, though — not only would it be incredibly bad-ass, but it would give the entire room a larger, more convenient view of the screen, too.

To just wrap up this section of the post, here is my general view of the room each and every week:

So what about the software and actual recording? Not much has changed in that area, except the effort I ask of my usual participants coming in over the Internet.
Everything is still recorded and primarily edited in Audacity. 44 kHz, mono. Done and done. I also still use the Call Graph plugin to record Skype conversations, but rarely in the same way as described last time around. Previously, I would take its 11 kHz output with my own track in the left channel and other side in the right channel, kill my track, turn the other track mono, re-export it, and use that as the secondary audio track to edit with, which isolates the other side of the conversation and lets me cleverly edit around any inadvertent talking over each other, etc.

These days, because all of the regulars (Julian, Heath, Jake, Corey, etc.) actually know how to use a computer, I simply ask them to record locally on their own side, as well — that’s the second track I use (after recording they send me the audio, usually as a high bitrate MP3, rather than the needlessly larger WAV). I still use Call Graph as a backup, and usually to line up the two separate tracks. I place my own local track up top, bring the Call Graph stereo track below it, and then the other person’s local track below that, line them all up, kill off the Call Graph track… voilà! It sounds far more complicated than it actually is — since Audacity lets you zoom in to insane degrees, I can line up the tracks to the tiniest fraction of accuracy possible.

By not using Call Graph (never mind its 11 kHz limitation, despite its amazing convenience and other customizations), we avoid any of that traditional “Skype noise” — you don’t hear someone’s call quality drop with their Internet connection fluctuations. In addition to that, by actually editing the show, we can avoid any excessive talking over each other, usually done by accident due to minor audio delays — I will typically just say, “Oh hey, start that sentence again.” It’s little stuff like that which folks may not even specifically notice, but I hope makes an impact in the back of their head somewhere while listening and comparing to other shows.
After editing the tracks (which have already been noise-removed prior to editing), I spit the product out to Levelator to even things out. I still bring everything into a project file in Adobe Premiere to line up the bumper music — it’s one of those relics I can’t let go of. The block-based dragging and snapping, along with a pre-edited bin of all the bumper music, makes it very easy to cut the sections apart. I usually leave a 10-second gap in between sections while editing to make it easy to visibly tell in Premiere where the sections need to be spliced with the jingles.

I may upgrade the software some day (likely Adobe Audition), but I figure until I know more about how audio actually works, it’s not really worth sinking the money into software.
About those other folks, though — what are they all recording with these days? Well, the two most relevant folks to note here are Julian and Heath.
Julian uses the Elecom HS-NB01UBK (~$30) headset that he picked up over there in Japan. As you have been hearing lately, it catches the bass of his voice quite well. It picks up a fair amount of background noise, but I am able to kill that off with some basic filtering in Audacity well enough. Since I am editing with multiple tracks, that means I can also just silence out an entire area on his side if I need to. I ask that my co-hosts don’t rely on that and practice proper microphone etiquette and all, but at the end of the day, you cannot control when the little one decides to yelp!
Then there’s Heath. Up until recently, he has been using whatever generic headset he’s had lying around (he tells me it was the Logitech USB Headset H530). You may have been able to hear it (even though I try to cut around it as much as possible), but it would randomly peak when he would start talking, and it picked up a rather huge amount of background noise — it’s the kind of headset that works fine for gaming and casual conversations, but not for podcast discussions. With all the great content him and I planned on bringing to the podcast in the future, this just couldn’t last. In response to some random chatter on Twitter, we made it known that we were looking to upgrade Heath to some actual audio equipment. Our buddies Lemmy and Ryan came through with some donations that covered it all… within minutes! Heath would really have no need for a mixer setup the way I have things, so we decided to go with a dedicated USB setup for just himself. In addition to a generic pop-filter and the same Samsom BT4 boom stand (~$40) that I use, we went with the USB version of my microphone: the MXL 990 USB (~$100-150). Unfortunately, the USB version of the microphone comes with just a little stand that would never work for the way we like to actually be comfortable while recording, so to complement the mic and boom stand, I sent him an old, only-semi-broken MXL 90 shockmount (~$35) that I had from my first microphone (I had since gotten a replacement as a gift). One of the screws was slightly stripped, and the inside rubber portion needed a little glue, but all-in-all it was in perfectly fine shape! Appropriately so, Lemmy wanted a picture of Heath’s new recording setup… and so did I for this blog post!

Here’s what the good sir had to say about it:
I’m loving the new setup, and the audio quality is SO much better! After messing around with things, this is the setup I finally settled on. It’s somewhat like what I was using before, only my Logitech headset is now replaced with my new fancy microphone and boom stand. The MXL 990 USB powered condenser microphone is plugged into my laptop on the left, whose only purpose is to record the mic audio in Audacity. The laptop is also used to connect to Skype if I’m recording with anyone else over the world wide web. I then use my personal desktop computer to look up references while recording; typically there’s Kanzentai on one screen and Daizenshuu EX on the other. I would record on this computer, but Audacity tends to crash once I hit the stop button. Luckily my mouse and keyboard are Bluetooth, so I can set the keyboard in my lap if necessary. Of course I just use my headset as head phones while recording. But more importantly, there’s usually a beer just to my right on the desk and there’s a mini fridge full of it behind me.
So that’s pretty much where we stand. I don’t feel the need to really upgrade a whole lot more on my end, with the possible exception of eventually having four of the same microphones so even Jeff doesn’t have to bring one over. Oh, and some more folding chairs would be nice. Maybe a new desk eventually, too. And a mini-fridge for beer convenience. Do they make silent mini-fridges…?
(NOTE: We did not consult each other re: mini-fridges prior to writing this…)
I guess we should also treat Jake to upgraded equipment at some point in the future. Julian, too, if and when he ever makes his way back to the states.
Leave a Reply to Kuhan Cancel reply